Thursday, March 28, 2019

Speeding up the Sieve of Eratosthenes with Numba

Lately, on invitation of my right honourable friend Michal, I've been trying to solve some problems from the Euler project and felt the need to have a good way to find prime numbers. So implemented the the Sieve of Eratosthenes. The algorithm is simple and efficient. It creates a list of all integers below a number n then filters out the multiples of all primes less than or equal to the square root of n, the remaining numbers are the eagerly-awaited primes. Here's the first version of the implementation I came up with:
def sieve_python(limit):
    is_prime = [True]*limit
    is_prime[0] = False
    is_prime[1] = False
    for d in range(2, int(limit**0.5) + 1):
        if is_prime[d]:
            for n in range(d*d, limit, d):
                is_prime[n] = False  
    return is_prime
This returns a list is_prime where is_prime[n] is True n is a prime number. The code is straightforward but it wasn't fast enough for my taste so I decided to time it:
from timeit import timeit

def elapse_time(s):
    s = timeit(s, number=100, globals=globals())
    return f'{s:.3f} seconds'

print(elapse_time('sieve_python(100000)'))
1.107 seconds
1.1 seconds to check 100000 values sounded indeed too slow so I decided to precompile the function with Numba:
from numba import njit

@njit
def sieve_python_jit(limit):
    is_prime = [True]*limit
    is_prime[0] = False
    is_prime[1] = False
    for d in range(2, int(limit**0.5) + 1):
        if is_prime[d]:
            for n in range(d*d, limit, d):
                is_prime[n] = False  
    return is_prime

sieve_python_jit(10) # compilation
print(elapse_time('sieve_python_jit(100000)'))
0.103 seconds
The only addition to the previous version is the decorator @njit and this simple change resulted in a whopping 10x speed up! However, Michal shared with me some code making me notice that combining Numba with the appropriate Numpy data structures leads to impressive results so this implementation materialized:
import numpy as np

@njit
def sieve_numpy_jit(limit):
    is_prime = np.full(limit, True)
    is_prime[0] = False
    is_prime[1] = False
    for d in range(2, int(np.sqrt(limit) + 1)):
        if is_prime[d]:
            for n in range(d*d, limit, d):
                is_prime[n] = False  
    return is_prime

sieve_numpy_jit(10) # compilation
print(elapse_time('sieve_numpy_jit(100000)'))
0.018 seconds
The speed up respect to the first version is 61x!

Lessons learned:
  • Using Numba is very straightforward and a Python function written in a decent manner can be speeded up with little effort.
  • Python lists are too heavy in some cases. Even with pre-allocation of the memory they can't beat Numpy arrays for this specific task.
  • Assigning types correctly is key. Using a Numpy array of integers instead of bools in the function sieve_numpy_jit would result in a slow down.
Update: Thanks to gwillicoder who made me realize the code could be speed up checking if the divisor is a prime and providing a very efficient numpy implementation here.

Saturday, March 23, 2019

Visualizing the trend of a time series with Pandas

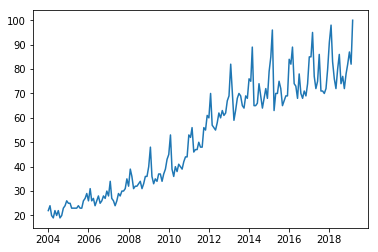
The trend of time series is the general direction in which the values change. In this post we will focus on how to use rolling windows to isolate it. Let's download from Google Trends the interest of the search term Pancakes and see what we can do with it:
import pandas as pd
import matplotlib.pyplot as plt
url = './data/pancakes.csv' # downloaded from https://trends.google.com
data = pd.read_csv(url, skiprows=2, parse_dates=['Month'], index_col=['Month'])
plt.plot(data)


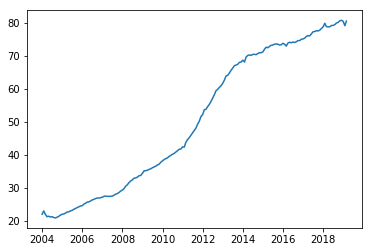
Looking at the data we notice that there's some seasonality (Pancakes day! yay!) and an increasing trend. What if we want to visualize just the trend of this curve? We only need to slide a rolling window through the data and compute the average at each step. This can be done in just one line if we use the method rolling:

y_mean = data.rolling('365D').mean()
plt.plot(y_mean)


The parameter passed to rolling '365D' means that our rolling window will have size 365 days. Check out the documentation of the method to know more.
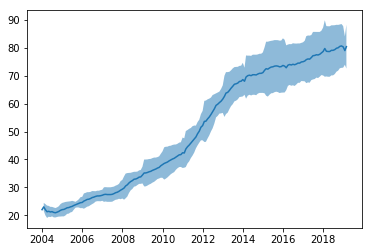
We can also add highlight the variation each year adding to the chart a shade with the amplitude of the standard deviation:

y_std = data.rolling('365D').std()
plt.plot(y_mean)
plt.fill_between(y_mean.index,
                 (y_mean - y_std).values.T[0],
                 (y_mean + y_std).values.T[0], alpha=.5)


Warning: the visualization above assumes that the distribution of the data each year follows a normal distribution, which is not entirely true.

Wednesday, March 20, 2019

Ravel and unravel with numpy

Raveling and unraveling are common operations when working with matricies. With a ravel operation we go from matrix coordinate to index coordinates, while with an unravel operation we go the opposite way. In this post we will through an example how they can be done with numpy in a very easy way. Let's assume that we have a matrix of dimensions 4-by-4, and that we want to index of the element (1, 1) counting from the top right corner of the matrix. Using ravel_multi_index the solution is easy:
import numpy as np
coordinates = [[1], [1]]
shape = (4, 4)
idx = np.ravel_multi_index(coordinates, shape)
print(idx)

array([5])
What if we want to go back to the original coordinates? In this case we can use unravel_index:
np.unravel_index(idx, shape)

(array([1]), array([1]))
So now we know that the elements (1, 1) has index 5 ;-)